Showing posts with label crafty friday. Show all posts

Friday, December 6, 2013

Crafty Friday: Yarnaments

What better way to spend a cold, blustery day than in the studio, crafting, [and wrangling a busy baby]!


 Today's Crafty Friday project is a simple, cute, yarnament [yarn ornament]. The idea started with these:

If you have a little one, you might recognize these as lids to baby food pouches such as these:

I've always liked the bright colors and interesting design of these lids, and thought they would be great for future craft projects, so I saved them...all of them. 
[Hello, my name is Vanessa, and I'm a craft supply hoarder.]
For today's craft, though, the color and design don't really matter. But, I'm upcycling, which is always a good thing. 
I've been wanting to create yarn covered ball ornaments for a while now, but Styrofoam balls are expensive, and I'm cheap, and I have about 75 of these plastic lids, so I decided to use them as the base. 

To start, I threaded the yarn through the opening and tied a knot, making sure I left a few inches of yarn at the end, like so:

Next, I started wrapping the lid with the yarn, leaving the extra string exposed:

 Because these are plastic, the thread tends to slide off easily unless I held it down with my thumb as I wrapped. You can also secure it with a bit of glue periodically. I kept wrapping until the lid was completely covered. Just a note, I used the same color lid as the yarn I was wrapping it with, so if there were gaps, they were less noticeable. Once the lid was completely covered, I knotted the end with the excess yarn from the beginning knot:

 Then, I made a loop, secured it with another knot, and cut off any excess strings:

Finally, I glued a button to the center of the ornament: 

I continued with the steps above and made a variety of ornaments:


Once the tree was decorated, I showed my sweet Gus, who absolutely loved...


                                                                      his dresser knobs.

Oh well, I like the yarnaments.
Happy crafting!
xo
nessa dee

Thursday, September 19, 2013

Crafty Friday: Color Theory Abstracts

Yes, you saw that right. It's a Crafty Friday post! Since I'm teaching an art class on Friday to middle and high schoolers, I have to come up with lesson plans, projects, and samples. And since I have to make samples, I might as well share them on my blog. 

Since I've got a range of ages and skill levels in my class, I wanted to give them a few basic lessons to help prep them for what's to come. Knowing color theory will be quite useful in some of our projects, so we worked on color mixing and theory with this project, which is a little more fun than just making a color wheel.

First, if you're not familiar with color theory, you can check out this lesson here

You will need a large square piece of paper [I used 12x12"], with two lines dividing the square in half vertically and horizontally to make four equal quadrants. You will also need a smaller square the size of one of  the quadrants [in this case, 6x6"]. On the smaller square, draw a design consisting of shapes, lines, simple objects. The key is to not over complicate the design because you will be painting each part in different shades of color. Here's what I came up with:


If you need some ideas, here are several design samples:

The next step is to transfer your design into each of the four squares on your larger piece of paper. If you don't have a light box to use, you can do this by taping your small square onto a light filled window, and holding your larger paper over the design so you can trace it onto your piece. Once the whole paper is filled, you're ready to start painting. 

The first square will contain a monochromatic color scheme, which means one color. Pick a single color to work with [I chose blue], and make tints by adding white, or shades by adding black. Paint each of your shapes in a variety of tints and shades.


The next square will be filled with analogous colors [colors that are next to each other on the color wheel]. I chose red-orange, orange, yellow-orange, and yellow. 


The last two squares I filled with complimentary colors [colors opposite each other on the color wheel]. I chose to work with purple + yellow and green +red. [The third combo is blue + orange]. I made tints and shades of each color and filled in the remaining squares. And the end result is a nifty abstract art piece:

I got the idea for this lesson from a blog called Art Confidence. Check it out for more great examples of this project.

Happy Crafting!
xo
nessa dee

Friday, July 19, 2013

Crafty Friday: Sailboats

As promised...here's a special Crafty Friday featuring the sailboats my mom and grandpa made for Camp Shakamalaca.

To make the boats, you will need scrap lumber, dowel rods, small finials, wood glue, and canvas, and while some power tools and a sewing machine were used to make these boats, they can be created without them.  I wasn't there for the making of the boats [just the decorating and floating], but I'll do my best to provide how-to instructions.

The first step is to take a 10" piece of 1x4" lumber and cut the corners off one end as to create the triangular bow of the boat. If you don't have a saw, some home improvement stores will cut the lumber for you. You can even nix the corner cutting and have a rectangular shaped boat.

The next step is to drill a hole that is the same size as your dowel centered 4" from the tip of your bow. This is where you will place the mast. Drill two more holes off center towards the end of the boat [as pictured]. These will be your "passengers." [Ignore the three small holes on the front...this is scrap lumber.]
If you don't have a drill, you can use a small mound of self drying clay to secure the mast into place.

The next step is to insert the dowels into the holes and add a bit of wood glue to secure them.

The dowel for the mast should be about 10" long, while the ones for the passengers should be cut to the size of your finial insert. Again, if you don't have the proper tools, ask someone at a home improvement store to make the cuts for you.

Next, glue your finials on the small dowels with a dab of wood glue.


For the sail, cut a piece of canvas in a right triangle with the straight edges measuring approximately 10.5" x 8", leaving a half inch extra on the diagonal piece as well. 

Begin hemming up the edges a half an inch on the diagonal and bottom of the sail.

As for the long edge, make sure you leave a pocket large enough to slip over the mast, like so...
Then, assemble your boat and admire it for a little while...


Next disassemble your boat and let the kids decorate it...

Finally, tie a string to the mast and float the boat...


Happy crafting!

xo
nessa dee


Tuesday, May 28, 2013

butcher paper + table top =


This isn't a new idea. We've eaten at a number of restaurants that have implemented this clever trick to keep their patrons occupied while waiting for food. But a light bulb went off in my head the other day when we were expecting friends for dinner. I decided that our table needed a table cloth so I could clean up the mess easily. Then, the thought of having to shake out, spot treat, and wash my sunny yellow table cloth seemed to be more work than just wiping down the table itself. And that's when I remembered our huge roll of drawing paper just sitting, unused in our easel upstairs. And since we always have a can of colored pencils at the ready in the middle of our table, it just made sense.

And the result?

Practically perfect children.

This paper-on-the table idea is a keeper. We had more fun adding pictures to our tabletop mural. Each day there was a new little surprise in the form of a picture, and I looked forward to seeing what cropped up next. I left the paper on for more than a week before I decided it had done its job [catching spills], and finally removed it, much to the dismay of my little artists. We had to say good-bye to a few of our tabletop friends, but I'll be adding another pristine paper surface today and will await the new surprises.

so
nessa dee

Tuesday, May 7, 2013

What's this? A craft project, you say?!

Yes, yes, I finally got around to getting a craft project done, and the most amazing thing about it [besides the fact that I'm actually posting a craft project after so many months] is that my as of late reluctant crafters are still outside, crafting away.

I call this one "Fingerprint Balloons" and I totally ripped it off of Pinterest. You can check out the original craft here. It's pretty self explanatory...you just dip the tip of your finger in paint, and print it on your paper. Then, with a fine-tipped marker, draw a bunch of balloon strings for your fingerprints. You can even attach them to an object like a bicycle, a person, a penguin, or a house ala UP.


The hardest thing about this project was getting the sticky price tag off the frame for the poor quality photo op.

Happy Crafting!
xo
nessa dee


Thursday, February 14, 2013

Happy Heart Day

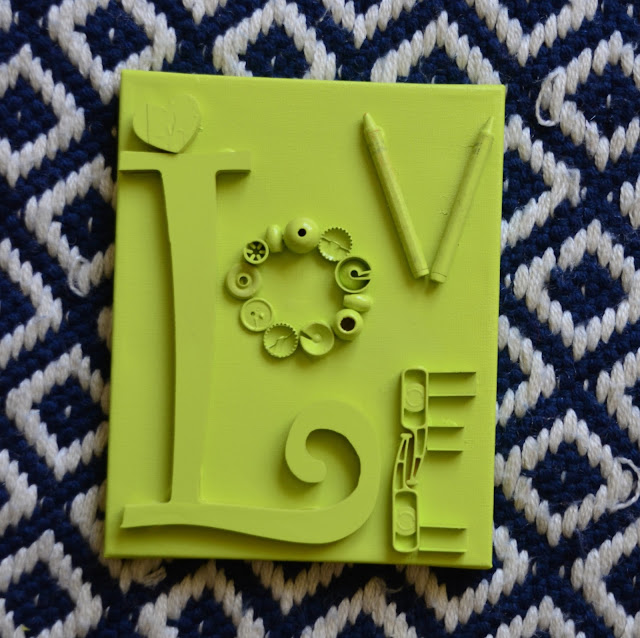
As promised, I have a fun and easy and super cute Valentine's Day craft for you. Here are the three easy steps...

Take some junk + a canvas:

Arrange the junk on the canvas and add hot glue. [here's where you can get a little Valentine's Day theme going...perhaps a love word like, I don't know, love?]

Perfect for a tween room...


Hope you have a wonderful day, full of love!
xo

nessa dee

Saturday, January 26, 2013

Crafty Crafty: hand print monsters

The kids were excited about making hand print monsters...at first. But once Saturday morning tempted their  eyes with cartoons and Saturday afternoon tickled their senses with mild weather, crafting wasn't the first thing on their brain. I finally got them into the studio to turn out some rather hurried monsters.

At least they liked getting their hands messy with paint.


scary, huh?

happy crafting, or cartoon watching, or playing outside, or eating, or not.

xo
nessa dee


Friday, January 11, 2013

crafty friday: button hearts

 Buttons, glue, paper, and a willing participant are all you need.


And voila! 


Simple, quick, and cute.

Happy crafting!
xo
nessa dee

Saturday, December 1, 2012

Easy Ornaments # 1

Happy first day of December! Are you excited? Stressed? Cold? Cozy? Crafty?In shock that it's already time for Christmas?

Well I had big plans [as I usually tend to] to have a handmade holiday. I was going to make tons of ornaments, garland, goodies, stockings, and on and on. But that all flew out the window when December sneaked up on me, tapped me on the shoulder, and said "Surprise!" I still plan to make some things, but my plans are quickly becoming less and less grand. When your choices for what to do with your free time become 'take a bath' or 'eat a meal', those hand-embroidered stockings are put on the back burner. I don't know how all of these other crafty ladies with small children get things done. Their kids must nap.

So quick and easy ornaments are the name of the game.

First up, remember these guys?


A few cans of spray paint...


  1.  some yarn...


a kid to help hang them...


and viola! 
xo
nessa dee

PS If you wanted a copy of The Seed, please email me at nessadeeart@hotmail.com

Also I didn't forget about the giveaway. [okay I kind of did...yesterday was really really busy, busy. Please don't judge me.] I will announce the winner on Monday. 


Friday, September 21, 2012

Crafty Friday: Spooky Castle

Today's Crafty Friday was going to be a tricked out repeat of a castle we made 3 years ago, that is, until my kids had another idea. With Halloween just around the corner, and Hotel Transylvania about to come out in theaters, my kids wanted to make Dracula's castle. So my idea of a fanciful medieval castle with climbing roses and a princess tower was replaced with dark stones, Gothic windows and bats. But I have to admit, the castle looks pretty awesome. 

Here's what you need:

We decided to go with spray pint to cover all of our boxes and cans because it's quick, but craft paint will work just as well as will cover the pieces with construction paper like we did with our old castle.

Once you've painted your pieces, start arranging them how you want. Once you've got a design you like, glue it together with hot glue [parent's, of course]. 


Then, you can start embellishing the castle. We added tissue paper brick, and silhouette windows. For instructions on how to make the tops of the spires refer to the old castle post here.


 As a finishing touch, Audrie added bats strung on fishing line, a weather vane, and spooky trees.


With that we have our spooky castle, and I can say that I've officially started [and probably finished] decorating for the season. 

xo

nessa dee